Handbrake is open-source and free software which is a great tool for converting video files, including getting your film off of a DVD or Blu-ray and into a single file like an .mp4 or .mkv, a process also known as “ripping.” It’s available for Windows, Mac, and Linux, and is one of our favorite tools at Xerb.
DVD and Blu-ray resolution
Typically DVDs are in 480p Standard Definition (SD). If you have access to a higher quality file, that is always preferable, and ideally it should be 1080p (full-HD). You should only get your film from a DVD if you don’t have another option.
Blu-ray is usually 1080p (full-HD), but sometimes only 720p (HD). Again, if it is 720p, it’s preferable to use a full-HD file if you have one.
In either case, HandBrake will allow you to verify the resolution before ripping it to a file.
Note: some DVDs and Blu-rays have copy protection enabled. If so, that is beyond the scope of this guide, and the instructions below will not work.
Step 1: Download and run Handbrake
Download HandBrake from the official site, and run the downloaded file to install the program. Follow the installation prompts to get HandBrake installed.
Once installed, open HandBrake.
Step 2: Insert the DVD/Blu-ray disc and choose the settings
If you haven’t already, put the disc into the disc drive. From within HandBrake, you can click on Open Source, and should see the DVD/Blu-ray that you’ve inserted.

HandBrake will scan the title, and show metadata for it. On the Summary tab, you will be able to see the Size, which is the resolution of the video itself. For example, a DVD may show up as 720×480, or 720×576, which are both Standard Definition (SD). It’s okay if these don’t match exactly, as this will be dependent on the aspect ratio of your content. Xerb will preserve the original aspect ratio.
Step 3: Choose the Preset and Output
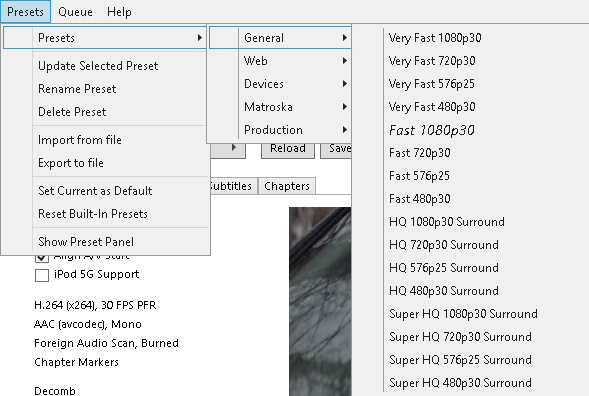
HandBrake comes with a number of different “Presets” that determine how the video will be encoded. These are accessible from the “Presets” menu:

We recommend using the “General” presets (not “Web”). You will notice that there are quality options, as well as resolution options for each of the quality levels. For the quality, the main tradeoff is time: it takes much longer to encode something using a Super HQ setting vs. i.e. a Fast setting. We recommend using Fast or better.
For the resolution option, choose the one that is closest to the second number in the resolution. For instance, if under “Size” on the summary tab it lists 720×576, you should choose the 576p25 option, or if it shows 720×480 you should choose the 480p30 option. Note that it will not produce a higher quality output if you were to exceed this number, because you will always be limited by the resolution of the content on the disc.
Finally, at the bottom of the screen is a field called “Save As”. You can click Browse here to choose where you want to save the file.
Step 4: Start the Encode
Click the Start Encode button.

At the very bottom of the screen, you should see a progress indicator to let you know that it is processing. Especially if you chose a higher quality level, it may take quite a while (even several hours) to finish.

Once it has, try playing the file and make sure you’re happy with the result. You can then proceed to upload your film to Your Video Library.
Depending on whether you are adding the film to a channel run by somebody else or to your own channel, you should have received separate instructions on what to do next. However, if you need any help, feel free to contact us at support@xerb.tv or +1-844-493-7288.