Videos you upload can be made available in two ways:
- Watch Anytime subscriptions. Users pay a monthly fee to view a curated collection of content, including your video.
- Virtual Events. Users pay a one-time fee to attend the event and watch the content that is part of it. Each Virtual Event has a start and end time, and may have a limited capacity.
What you need
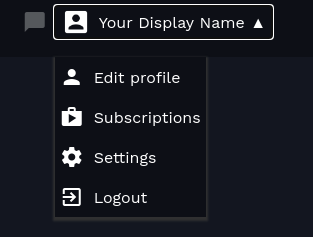
If you do not yet have an account, you will need to set up either a Creator account or a Channel Runner account to upload videos. If you have an existing account, you can click the dropdown menu next to your name, then choose Settings and Change Account Type.
- A video file in any single-file format (i.e. .mp4, .mov, .avi, .m4v, .mkv, .wmv, etc.). Preferably at least full HD resolution. If you only have the film on physical media then please contact us, we may be able to help.
- A preview image. This is the image that is shown before a user clicks Play on the video, and is cropped to 16:9 960x540px. It does not need to be exact, you can crop/resize it when you upload it. Note that this is NOT a vertical movie poster.
- A thumbnail. This is shown in previews of the video, and is cropped to 16:9 256x144px. However, you can crop/resize it when you upload it as well. Often people use the same image as the preview image.
Step 1: Fill in video info
Click on Dashboard.

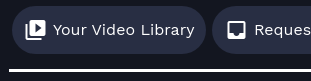
Click on Your Video Library. This is where all the videos you upload will be stored for later use in Virtual Events or Watch Anytime subscriptions.
Click Add a Video. Fill in the information asked in the form, and when you’re done click Next.
Step 2: Upload video and image files
Drag and drop any video file to the dotted upload area, or click on it to browse your computer for a file. Click Upload Video.
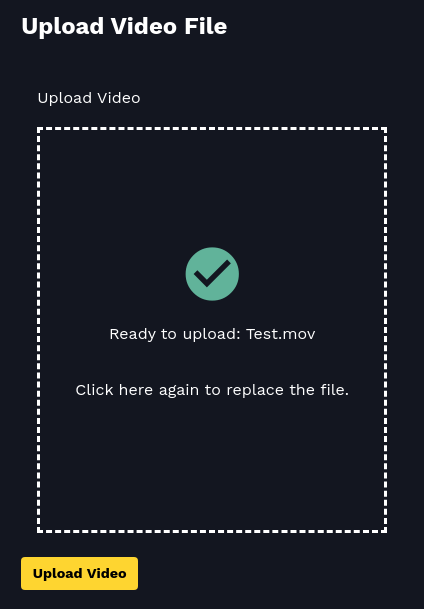
A progress indicator will appear. Do not change pages, close the page, or restart your computer while the file is uploading, or you will need to upload the video file again.

Note: if you want to upload multiple videos at the same time, you can open multiple browser tabs and repeat this process.
Once the upload is finished, you will see a success message and be directed to a page to add your preview and thumbnail images.
Click the “Change” button next to the default preview image and thumbnail images. Drag and drop a .jpg or .png image to the dotted area, or click on it to browse your computer for an image file.
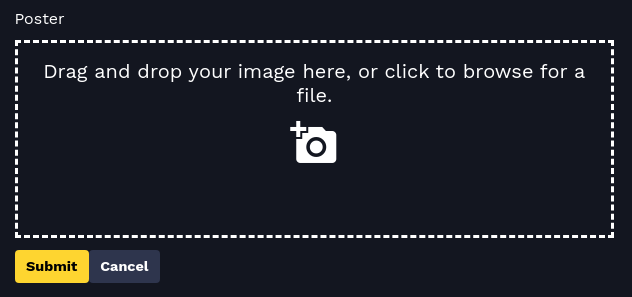
You can reposition, zoom, and crop the images before you upload them. The images will be cropped to the area inside the grey rectangle.
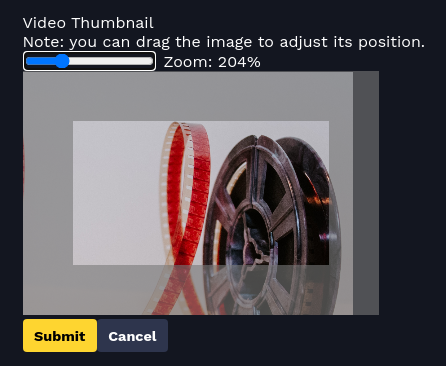
Click Submit to save each image.
The video file will automatically begin a transcode process. This is the process that changes your video file into the formats and resolutions needed for streaming.
The transcode process can take as long as 1.5 times the length of your video. For example, if your video is 1 hour long, it could take up to 1.5 hours to transcode. You may need to refresh the page or close/reopen it to check on the video’s status.
Once the transcode process completes, you can submit your video to Watch Anytime channels, and/or can make it available for use in Virtual Events.
Step 4: Put your Video on Channels
You can make your video available through the Watch Anytime or Virtual Event sections of channels, or both.
Watch Anytime
From Your Video Library, click Submit to Channels next to the video.
Click Start Request next to the channel you want to submit to.
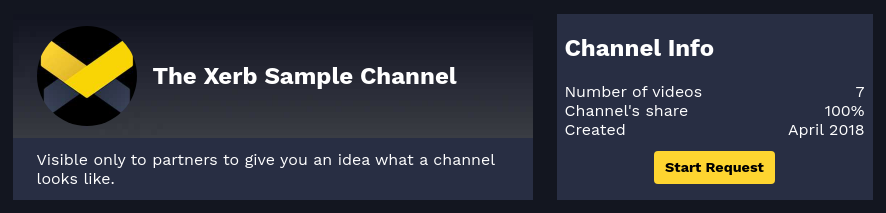
Review how the channel splits the revenue, and if you want to continue, click Submit Request at the bottom of the screen. The Channel Runner in charge of the channel will receive a notification letting them know you have submitted your film.
Virtual Events
If you plan to use your video for someone else’s Virtual Event, contact them to inform them that your video is ready.
If you plan to use your video in your own Virtual Event, it will now be available when you create or edit the Virtual Event. See Create a Virtual Event.
Next Steps
Coordinate with the channels you’re working with! Offer to send them things that can be used to promote your work. They may also want to collaborate on PR, social media, and more.
If your video will be part of a Virtual Event, ask the channel about participating in the Discussions. Virtual Events usually have text-based Discussions, where people can have conversations around the videos they watch. When the creators of the videos get involved in the Discussions, it adds a lot of value for the attendees and for the channel.
If you need help, you can contact us at support@xerb.tv or +1-844-493-7288
Our other tutorials: